2014-04-21 22:59:46
Μετά από χρόνια χρήσης, το πλαστικό κάλυμμα των προβολέων του αυτοκινήτου σας δημιουργούν το γνωστό θάμπωμα (πολυμερισμό) που εκτός της ελλεινής εμφάνισης των φαναριών και του αυτοκινήτου, που πλέον μοιάζει να έχει μαζέψει 10 χρόνια κακής συμπεριφοράς στην πλάτη του, υπάρχει και το θέμα πτώσης της απόδοσης και η περίεργη δέσμη των φώτων το βράδυ που δημιουργούν ένα πολύ περίεργο διάχυτο και ενοχλητικό φώς για τους απέναντι οδηγούς.
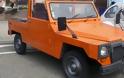
Τα καινούγια φανάρια είναι πλαστικά και όχι απο γυαλί για ευνόητους λόγους: ασφάλεια σε χτύπημα πεζού, βάρος, ευκολία κατασκευής και το πιθανότερο χαμηλότερο κόστος.Όμως όλο και πιο συχνά βλέπουμε νέα αυτοκίνητα με θαμπωμένα φανάρια.
Υπάρχει λύση εκτός από την αλλαγή τους;
Ψάξτε στο google για "fogged headlight" και θα δείτε πολλές λύσεις.
Από αναζήτηση στο διαδίκτυο για θαμπώματα και γρατσουνιές σε πλαστικά φανάρια,
φαίρινγκ μηχανών κλπ. βρήκαμε ένα οδηγό που μας δείχνει αναλυτικά και με εικόνες πως μπορούμε να διορθώσουμε μόνοι μας σχετικά εύκολα και με πολύ καλά αποτελέσματα και οικονομικά το πρόβλημα αυτό που αναφέρθηκε παραπάνω.
Πώς να καθαρίσετε το θάμπωμα από το πλαστικό κάλυμμα των προβολέων( των φαναριών) του αυτοκινήτου σας; δείτε:
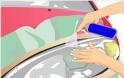
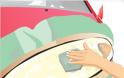
Method 1 of 4: Toothpaste Method
spaceplay / pause
escstop
ffullscreen
shift + ←→slower / faster (latest Chrome and Safari)
↑↓volume
mmute
←→seek
. seek to previous
12…6 seek to 10%, 20%, …60%
1
Use regular blue toothpaste for your headlights. Whitening toothpastes or those with mint have extra compounds that could actually damage your headlights.
Ad
spaceplay / pause
escstop
ffullscreen
shift + ←→slower / faster (latest Chrome and Safari)
↑↓volume
mmute
←→seek
. seek to previous
12…6 seek to 10%, 20%, …60%
2
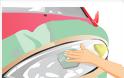
Apply toothpaste with a dry soft cloth. Rub in circular motions through small areas until the grime comes off.
3
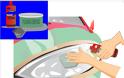
Rinse with water and wipe with a wet cloth
4
Apply some polish for an even shinier look.
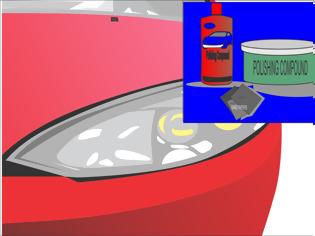
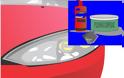
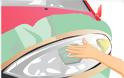
Method 2 of 4: Aluminum Polishing Compound Method
1
Recognize that the problem is caused because the outside cover is oxidized.This means the outside surface needs to be polished in order to be clear again.
spaceplay / pause
escstop
ffullscreen
shift + ←→slower / faster (latest Chrome and Safari)
↑↓volume
mmute
←→seek
. seek to previous
12…6 seek to 10%, 20%, …60%
2
Wash the outside of the lights with soap and water as you would when washing the rest of your car. Dry. This step will remove the grime and dirt before you start polishing.
spaceplay / pause
escstop
ffullscreen
shift + ←→slower / faster (latest Chrome and Safari)
↑↓volume
mmute
←→seek
. seek to previous
12…6 seek to 10%, 20%, …60%
3
Apply an aluminum polishing compound with a dry soft cloth. Put a little compound on it and work it on in small circular motions. Let it dry to a haze. Buff the haze off by wiping with a clean towel or cloth.
spaceplay / pause
escstop
ffullscreen
shift + ←→slower / faster (latest Chrome and Safari)
↑↓volume
mmute
←→seek
. seek to previous
12…6 seek to 10%, 20%, …60%
4
Repeat the polish and buff steps until clear again. It may need 3 coats or more.
Method 3 of 4: Lasting Clean Method
spaceplay / pause
escstop
ffullscreen
shift + ←→slower / faster (latest Chrome and Safari)
↑↓volume
mmute
←→seek
. seek to previous
12…6 seek to 10%, 20%, …60%
1
Purchase one piece of 400 grit, 1200 grit and 1500 grit wet sandpaper.
spaceplay / pause
escstop
ffullscreen
shift + ←→slower / faster (latest Chrome and Safari)
↑↓volume
mmute
←→seek
. seek to previous
12…6 seek to 10%, 20%, …60%
2
Clean the plastic headlight lenses at least twice with rubbing alcohol and clean paper towels.
3
Using a water spray bottle, wet sand the headlights thoroughly with 400 grit sandpaper. If the factory coating begins to come off, you will notice a hazy "line" begin to appear and change shape as it is sanded off. It is generally best to sand the coating completely off.
4
Proceed to sand out 400 grit sand scratches using 1200 and then 1500 grit sandpaper. On headlights with an interior texture where you cannot necessarily see the bulb, you can usually stop at 1200 grit paper. The headlights will look hazy, but even and not yellow.)
5
Clean once more with paper towels.
6
Have a local auto body shop mask and spray the headlights with a plastic adhesion promoter such as Bulldog, then spray with 2-3 coats of chemically hardened automotive clear coat. This should cost between $20-50, depending on the shop.The main benefits of this method is that it last years and not months as with buffing.
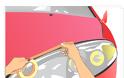
Method 4 of 4: Rain-X And Wax Method
1
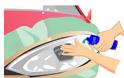
Buy a kit that has sandpaper pads, lubricant, cleaning polish/compound, and sealant (such as Rain-X).You can also buy the products separately. If you do this, the sand paper you're looking for is "Wet/dry" sandpaper in 800, 1000 and 2000 grit.
2
Tape off all paint surrounding the headlight. You do not want any polish or scratches on the paint.
3
Spray the lubricant onto the headlight and the sandpaper. Be sure to start with the lowest grit.
4
Firmly clean the headlight with the lowest grit until you can see the yellow film coming off the headlight. Your headlight will look scratchy and cloudy after this step until you finish with the highest grit.
5
Repeat the previous step, but use the next grit of sandpaper. Your headlights should start to look less cloudy.
6
Repeat one last time with the highest grit. Be sure to cover all scratches and your headlights should look decent at this point.
7
Apply the cleaner (such as Rain-X Xtreme Clean) to a rag and rub it onto the headlights. Allow it to dry and then buff it off.
8
Apply the plastic polish to a clean rag. Rub it onto the headlight as you did with the cleaner. Allow it to dry and then rub it off.
9
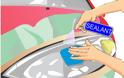
Spray the sealant on a clean rag. Apply it evenly across the whole headlight. Let it sit for a few minutes and then wipe off all excess liquid.
10
Your headlights should look brand new!
Tromaktiko
Τα καινούγια φανάρια είναι πλαστικά και όχι απο γυαλί για ευνόητους λόγους: ασφάλεια σε χτύπημα πεζού, βάρος, ευκολία κατασκευής και το πιθανότερο χαμηλότερο κόστος.Όμως όλο και πιο συχνά βλέπουμε νέα αυτοκίνητα με θαμπωμένα φανάρια.
Υπάρχει λύση εκτός από την αλλαγή τους;
Ψάξτε στο google για "fogged headlight" και θα δείτε πολλές λύσεις.
Από αναζήτηση στο διαδίκτυο για θαμπώματα και γρατσουνιές σε πλαστικά φανάρια,
φαίρινγκ μηχανών κλπ. βρήκαμε ένα οδηγό που μας δείχνει αναλυτικά και με εικόνες πως μπορούμε να διορθώσουμε μόνοι μας σχετικά εύκολα και με πολύ καλά αποτελέσματα και οικονομικά το πρόβλημα αυτό που αναφέρθηκε παραπάνω.
Πώς να καθαρίσετε το θάμπωμα από το πλαστικό κάλυμμα των προβολέων( των φαναριών) του αυτοκινήτου σας; δείτε:
Method 1 of 4: Toothpaste Method
spaceplay / pause
escstop
ffullscreen
shift + ←→slower / faster (latest Chrome and Safari)
↑↓volume
mmute
←→seek
. seek to previous
12…6 seek to 10%, 20%, …60%
1
Use regular blue toothpaste for your headlights. Whitening toothpastes or those with mint have extra compounds that could actually damage your headlights.
Ad
spaceplay / pause
escstop
ffullscreen
shift + ←→slower / faster (latest Chrome and Safari)
↑↓volume
mmute
←→seek
. seek to previous
12…6 seek to 10%, 20%, …60%
2
Apply toothpaste with a dry soft cloth. Rub in circular motions through small areas until the grime comes off.
3
Rinse with water and wipe with a wet cloth
4
Apply some polish for an even shinier look.
Method 2 of 4: Aluminum Polishing Compound Method
1
Recognize that the problem is caused because the outside cover is oxidized.This means the outside surface needs to be polished in order to be clear again.
spaceplay / pause
escstop
ffullscreen
shift + ←→slower / faster (latest Chrome and Safari)
↑↓volume
mmute
←→seek
. seek to previous
12…6 seek to 10%, 20%, …60%
2
Wash the outside of the lights with soap and water as you would when washing the rest of your car. Dry. This step will remove the grime and dirt before you start polishing.
spaceplay / pause
escstop
ffullscreen
shift + ←→slower / faster (latest Chrome and Safari)
↑↓volume
mmute
←→seek
. seek to previous
12…6 seek to 10%, 20%, …60%
3
Apply an aluminum polishing compound with a dry soft cloth. Put a little compound on it and work it on in small circular motions. Let it dry to a haze. Buff the haze off by wiping with a clean towel or cloth.
spaceplay / pause
escstop
ffullscreen
shift + ←→slower / faster (latest Chrome and Safari)
↑↓volume
mmute
←→seek
. seek to previous
12…6 seek to 10%, 20%, …60%
4
Repeat the polish and buff steps until clear again. It may need 3 coats or more.
Method 3 of 4: Lasting Clean Method
spaceplay / pause
escstop
ffullscreen
shift + ←→slower / faster (latest Chrome and Safari)
↑↓volume
mmute
←→seek
. seek to previous
12…6 seek to 10%, 20%, …60%
1
Purchase one piece of 400 grit, 1200 grit and 1500 grit wet sandpaper.
spaceplay / pause
escstop
ffullscreen
shift + ←→slower / faster (latest Chrome and Safari)
↑↓volume
mmute
←→seek
. seek to previous
12…6 seek to 10%, 20%, …60%
2
Clean the plastic headlight lenses at least twice with rubbing alcohol and clean paper towels.
3
Using a water spray bottle, wet sand the headlights thoroughly with 400 grit sandpaper. If the factory coating begins to come off, you will notice a hazy "line" begin to appear and change shape as it is sanded off. It is generally best to sand the coating completely off.
4
Proceed to sand out 400 grit sand scratches using 1200 and then 1500 grit sandpaper. On headlights with an interior texture where you cannot necessarily see the bulb, you can usually stop at 1200 grit paper. The headlights will look hazy, but even and not yellow.)
5
Clean once more with paper towels.
6
Have a local auto body shop mask and spray the headlights with a plastic adhesion promoter such as Bulldog, then spray with 2-3 coats of chemically hardened automotive clear coat. This should cost between $20-50, depending on the shop.The main benefits of this method is that it last years and not months as with buffing.
Method 4 of 4: Rain-X And Wax Method
1
Buy a kit that has sandpaper pads, lubricant, cleaning polish/compound, and sealant (such as Rain-X).You can also buy the products separately. If you do this, the sand paper you're looking for is "Wet/dry" sandpaper in 800, 1000 and 2000 grit.
2
Tape off all paint surrounding the headlight. You do not want any polish or scratches on the paint.
3
Spray the lubricant onto the headlight and the sandpaper. Be sure to start with the lowest grit.
4
Firmly clean the headlight with the lowest grit until you can see the yellow film coming off the headlight. Your headlight will look scratchy and cloudy after this step until you finish with the highest grit.
5
Repeat the previous step, but use the next grit of sandpaper. Your headlights should start to look less cloudy.
6
Repeat one last time with the highest grit. Be sure to cover all scratches and your headlights should look decent at this point.
7
Apply the cleaner (such as Rain-X Xtreme Clean) to a rag and rub it onto the headlights. Allow it to dry and then buff it off.
8
Apply the plastic polish to a clean rag. Rub it onto the headlight as you did with the cleaner. Allow it to dry and then rub it off.
9
Spray the sealant on a clean rag. Apply it evenly across the whole headlight. Let it sit for a few minutes and then wipe off all excess liquid.
10
Your headlights should look brand new!
Tromaktiko
ΦΩΤΟΓΡΑΦΙΕΣ

ΜΟΙΡΑΣΤΕΙΤΕ
ΔΕΙΤΕ ΑΚΟΜΑ
ΠΡΟΗΓΟΥΜΕΝΟ ΑΡΘΡΟ
Έτοιμα να… «καλπάσουν» τα ελληνικά Pony

ΣΧΟΛΙΑΣΤΕ


![Μαραθούπολη: Αναβίωσε και φέτος το κάψιμο του Ιούδα στο Λιμάνι! [video]](https://images.newsnowgreece.com/65/657079/marathoupoli-anaviose-kai-fetos-to-kapsimo-tou-iouda-sto-limani-video-1-124x78.jpg)
![Η Μενούνος δίνει τεστ στα ελληνικά και σκίζει! [video]](https://images.newsnowgreece.com/65/657078/i-menounos-dinei-test-sta-ellinika-kai-skizei-video-1-124x78.jpg)